NO-KNEAD WHEAT BREAD
One loaf serves 6 (or 4 depending on the people!)
INGREDIENTS:
- 3 cups all purpose flour, plus extra for dusting (I like a blend of white and ultra-grain flour)
- 1/4 tsp instant yeast (dry active yeast)
- 1 scant Tbsp salt (slightly less than a full Tbsp)
- 1 5/8 tepid water (slightly warm)
Directions:

Initial Mix
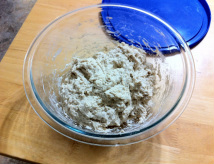
In a large bowl combine all above ingredients. Add 1 5/8 cup tepid water and stir until blended. Dough will be shaggy and sticky. If it appears too have too much liquid, just add a bit more flour until the dough is stickier. Cover the bowl and let rest at room temperature for at least 12 hours, preferably 18, (up to 24 hours still works). Dough is ready when the surface is dotted with bubbles and gluten (long strands that cling to sides of bowl when tilted) is well-developed.

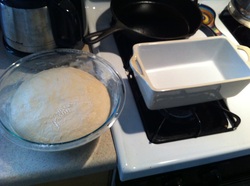
After second rise about to go into the oven
After the first rest, sprinkle more flour (up to approx. 1/4 cup) on the dough until you can work with it without it sticking to your hands. Fold the dough over on itself a couple of times and then shape it in to a ball and place back into the bowl. Re-cover the bowl to rest for another 2-3 hours. Dough should rise and will not readily spring back when poked.
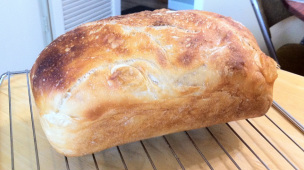
At least a half hour before dough is ready, preheat the oven to 450 degrees with your baking vessel in to preheat (I use either a round 2.5 qt white pyrex dish or a rectangular 9” x 5” pan). When the dough is ready remove the pot from oven and butter the bottom and sides of the pot for a light coat to prevent sticking - careful not to burn yourself! Then ROLL the dough from the bowl into the pot carefully to prevent deflating the second rise. It may look like a complete mess! Cover with the lid or aluminum foil and bake for about 25 minutes. Remove the lid or foil and bake another 15 minutes or so until it is browned. Remove from oven and dump out loaf on to a cooling rack. It’s great warm but doesn’t cut into slices well until cool.
** Although this all seems complicated when I read it, it is really easy. Make a few practice loaves before you serve for an event and you will get the hang of it (and enjoy eating it!). I have found that I can make this in less than 10 minutes total prep time and I always have the ingredients around. I have experimented with using different kinds of wheat flour which makes the bread a little more dense and great for peanut butter toast. Also I have added Rosemary and Basil to the original recipe for tasty herb bread, but I have always loved the regular loaf.
** Although this all seems complicated when I read it, it is really easy. Make a few practice loaves before you serve for an event and you will get the hang of it (and enjoy eating it!). I have found that I can make this in less than 10 minutes total prep time and I always have the ingredients around. I have experimented with using different kinds of wheat flour which makes the bread a little more dense and great for peanut butter toast. Also I have added Rosemary and Basil to the original recipe for tasty herb bread, but I have always loved the regular loaf.
